Wednesday, July 31, 2013

Vegan, gluten free omelet

    I normally eat eggs for breakfast. Pretty much every day my breakfast has dairy; milk in my cereal, yogurt in my smoothie, cheese in my omelet...sometimes all of the above! But right now I'm avoiding dairy, gluten, sugar and soy. 
    Yesterday I had a smoothie with brown rice in it for breakfast, not my favorite. The flavor was fine, it still tasted like a smoothie. The girls hated it. Bella said "I don't want to have to chew my smoothie mom!" She was right. You have to chew it. No thanks!
    What I wanted was eggs. An omelet to be exact. So I started looking online for vegan gluten free recipes. I found this page and the pictures looked yummy. The recipe was actually over on this page though, scroll down to number 5.
     So what did I have for breakfast this morning? My very first vegan omelet. Here's what I did...

Ingredients:
veggies- I used broccoli, zucchini, red bell pepper, and cilantro
olive oil
3/4 cup chick pea flour
1 clove garlic, crushed
1/2 tsp. turmeric
1/2 tsp. yellow curry powder
1/4 tsp. all-purpose seasoning salt
2/3cup almond milk
Jane's Krazy mixed up salt
pepper

DIRECTIONS:
Drizzle a bit of olive oil in your pan  and sauté the veggies so they soften slightly, but you don't want them completely soggy. While that is going on a low heat, in a mixing bowl add the chick pea flour, spices, and garlic.Then stir in the milk to make a batter. When veggies are done, take them out and set them aside. Pour in the batter, tilting the pan to let it spread around. Cook like you would a regular omelet.
 

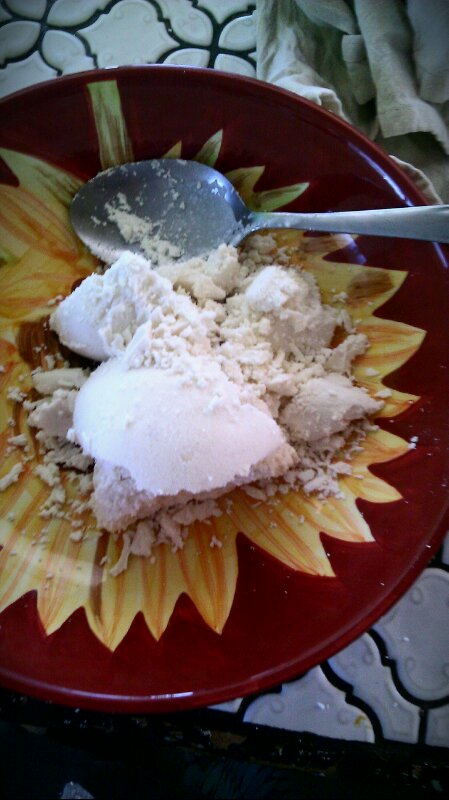
The chick pea flour. All I did was put dry chick peas (garbanzo beans) in my blendtec, and voila...flour!

The batter. It was pretty lumpy so I used my stick blender. Next time I might just mix it my blendtec.

I poured the batter in the pan and then seasoned with salt and pepper.

Flip it over.

Remember those sautéed veggies?

Add them to your pan now and top with cilantro...or not if you don't like it.

Fold it over. You do have to wait longer to do this than you would with eggs.

Get in my belly!!!

I ended up taking off the top piece, and eating it like this. the other half is in the fridge for tomorrow.
 
 
    Now this does not taste like eggs, but...BUT it is yummy and a half! Feeling a bit hopeful now that I know there's something that's vegan, gluten free, sugar free and soy free that I can enjoy in the morning!!!!

Sunday, July 28, 2013

I LOVE the $0.99 Store!!!!

    I love feeding my family healthy food. That can be super expensive sometimes. My kids are turning into teenagers and they are CONSTANTLY hungry! Especially now that they're home all day on summer break. I'm trying to teach them there is most definitely a difference between boredom and hunger, but I think most of what I say goes in one ear and out the other these days.
    Anyway I try to just make sure that what we have in the house is healthy that way they're not just filling up on junk all day. Like two weeks ago I bought 12 boxes of Cascadian farm organic granola bars. Why? Because they were at the $0.99 store. They're like $4 a box at Sprout's!!! My kids know they're only allowed to have one a day, they're good about that, so don't worry that that's all they'll be eating for a while.
    A week before that, I bought six bags of organic whole wheat flour from the $0.99 store. Again, "why?" you ask. Again, because they're like $5 at Sprout's!!!

    My most recent trip to the $0.99 store was fabulous!!! ...
4 quarts of heavy whipping cream, 2- 6 packs of Tropicana orange juice to go, a gallon of minute maid orange juice, 8 packages of dan-o-nino yogurts, 3 half gallon cartons of Silk coconut milk, 2 half gallon cartons of Horizon organic chocolate milk, and 4 half gallon cartons of Horizon milk!!!!!
 
    Total $24!!! The Horizon half gallon milk cartons were on sale at Sprout's this week for $3.49. I would've spent $20 just on the milk at Sprout's. While not everything I bought is organic, it is all stuff I would've bought anyway. I just prefer to get it for $0.99!!! Who wouldn't?
    I 've learned that first thing Saturday morning is a great time to go too! That's when they bring out new stuff to stock. But you've got to get there early, because there's a crowd, like buzzards, pulling stuff off the carts, so a lot of things never even make it to the refrigerator before they run out! You may say you don't feel like dealing with that, but honestly it's not horrible, crazy like people get at Christmas time. Everyone is pretty darn polite and the guy that does the stocking is a sweet heart.
    So, yeah...I like the $0.99 store, I like my thrift store, I like saving money!!!


Wednesday, July 24, 2013

Roasted tomatillo and tomato salsa recipe

    I'm white...on the outside. My heart, soul and taste buds are definitely Mexican though! We eat Mexican food, at minimum, 4 days a week, no joke. I use to make 3 cups of dried beans on Sunday to last us through the week, but that just wasn't cutting it. Last week I made 5 cups and I'm quite sure the only reason that lasted all week was because we ate a few nights. In fact, I've got a pot beans going right now.
   I love salsa, but it's gotta be fresh! Jarred salsa is soggy, sad looking, tasteless and just yucky! Salsa fresca is super easy and fast to make, especially if you just throw everything in your blender. But what I really love is the smoky taste of roasted chilies mmm! The key to roasting the chilies is to remember low and slow. Take your time. Enjoy the smell as it tickles the back of your throat and fills your house. Don't be surprised if your neighbors ask what your cooking, though, as the aroma spills out of your windows and dances on the breeze, teasing the outsiders, reminding them that they're not eating what you're making. Hahaha! Well maybe I'm over exaggerating now... just a bit.

Ingredients:
tomatillos (outer husk removed)
tomatoes
jalapeño peppers
poblano pepper (I de-seed mine first, but it's probably not necessary)
onion
garlic
cilantro
lime juice
salt
oregano
cumin (optional)

Directions:
Roast the tomatillos, tomatoes, jalapeños, poblano pepper, onion, and garlic. When the poblano pepper is done, you need to let it steam in a plastic bag, and then peel the "skin" off. Let these items cool enough that you can handle them with out burning yourself, then just chop it all up, and mix it all together. And there you have it.
 
Just started roasting.

It's way easier to chop the onions first.
(I didn't get a pic of everything roasting, sorry)

The poblano pepper is done and placed in a plastic bag to steam, I usually add just a bit of water to the bag also. I did throw the jalapeños in there too, but didn't peel them, just let them cool.

Peeling off the "skin", very important, do NOT skip this step!!!

Everything's cooled enough to start chopping. See how soggy the tomatoes and tomatillos are? That's how they're supposed to be.

Hey, look! Salsa!


    What I love about salsa is there really is no wrong way to make it. Just play around with it until you get the flavor that makes your tongue do the happy dance. I never ever EVER measure when I make salsa. When I think it's done I grab a chip and taste it. Adjust where I feel it needs it, be it more lime or salt or whatever, then grab another chip and taste it again. Then when I think I'm really done, I have hubby taste it. When he likes it I know it's done!

Easy homemade dill pickles

    My girls and I loooooove dill pickles, but...but...we're very picky. Our favorites are the New York Deli style pickles that we can only get at Costco. It's no big deal, it's a huge jar and only costs like $5, the problem is they don't always have them. Our second and ONLY other choice are the claussen brand pickles.
    I've been wanting to start canning and pickling things for a while, but again, well, I'm a huge procrastinator- truth be told. But when I saw these lovely little pickling cucumbers at my local $0.99 store I was like "Heck, the heck yeah!!!!".
   So I bought 2 bags, that sadly got shoved to the back of my fridge and ended up being thrown away <- see procrastination. It was so stupid too, because I had bought a set of mason jars at *gasp* Wal-Mart (I'll explain my disgust for this company later, or perhaps not at all. If you don't have anything nice to say...right?) Anyway, this lovely little set of jars came with a pickle seasoning packet all I had to do was cut up the cucumbers and boil some water. How lazy am I? don't ask!
   Well,last week I was at the $0.99 store and again they had my little pickling cucumbers. This time I only bought 1 bag, you know? Just in case.
   
Ingredients:
pickling cucumbers
seasoning packet
water
5% acidity vinegar
mason jars and lids

Directions:
Cut 1/4 inch from each end of the cucumbers, and then cut them into spears. We also decided to cut some into chips for when we have hamburgers and sandwiches. Boil the contents of packet, water and vinegar. Place cucumbers into jars. Fill jars with hot liquid. I let my pickles chill on the counter top for a few hours then refrigerated. The chip style pickles were ready the next day. We didn't try the spears for a few days.

Getting everything ready.

The brine.

Just finished!

The seasoning packet that came with my jars.
I forgot to get a picture of them after they were ready to eat, Ill have to do that!


    They were sooooooo good. The girls and I have each eaten a few here and there, but really just kind of tasting them. Yesterday, we had friends over and we made sandwiches for lunch and finished an entire jar!!!! Big thumbs up all the way around. Next time I will make them completely from scratch. It's good to know I can just make my own pickles now.
*There were directions on the packet for how to prepare the pickles if you wanted to enjoy them within a few days and also if you wanted to can them and store for later. We obviously opted for the quick method ;)

Chipotle Honey Vinaigrette Recipe

    Yes, I know it 's been waaaaaaaaaaay toooooooooooooo looooooooooooooong since I've posted anything. I'm sorry :(  Ready for my list of excuses? 1- I got a job, yay!!! 2- Because of said job, I've been super lazy and we've been eating out way too much, boo 3- It takes longer to blog than I originally thought, so when I get the urge, I'm like "ugh! Not enough time, I'll do it later" 4- I could keep going but I think you guys get the point, right?
    So, now let's talk food! I stinking love Chipotle! Its one of my go to spots. For under $8 I get a fresh, yummy, vegetarian salad. Yes!I know I could make a salad at home for cheaper, but sometimes, especially with the kids out on summer vacation, I just need to grab something quick before I head into work. Now, "what makes their salad so yummy?" you ask. Great question! It's the salad dressing. The stuff is so good I'm quite sure I could drink it!!!! The stuff is AMAZING!
   So, like 2 weeks ago I tried looking up a recipe for their dressing online. I found this recipe. By now, I think you're all aware of the fact that I'm horrible at measuring and I never follow recipes exactly. The first time I made it I was in a super hurry and just threw all of the ingredients into my blendtec and it's was good and a half. the second time I made I followed the recipe measurements and you know what? It's was so stinking oily :(  that's all you could taste. It upset my tummy almost immediately and neither hubby nor I finished our salads.
    As we were putting our leftovers away, I fixed the salad dressing and have been enjoying since. I even took in a huge salad with all the fixings and my salad dressing to work to bless my coworkers with lunch and it was a big success. The ladies have already declared that I shall be the one who'll be cooking for us at our next conference!

Ingredients:
1/2 cup red wine vinegar
1/3 cup honey
1TBSP adobo seasoning (more or less to taste)
1TBSP oregano
1/2 olive oil

Directions:
I threw everything in my blendtec and pressed the salad dressing button.


Everything in the blender.
 
After it's been blended (it will separate again after it sits a bit).
 
 
On my salad!
 
 
    See? Easy peasy!  Now, for the salad it's: lettuce, cabbage, grilled onions and red and green bell peppers, corn salsa (I'll get a recipe for this up soon), a roasted tomato and tomatillo salsa (I'll get a recipe for this up soon too), rice and beans (at the restaurant I get brown rice and black beans, but here I had my Mexican rice and homemade refried beans- I'll post up my recipe for this as well), guacamole, shredded cheese and this superb salad dressing.
So...what are you waiting for? You know you wanna go cook now ;) You're welcome! Enjoy!!!


Friday, March 1, 2013

How I love the thrift store, let me count the ways!

   Hello friends!!!! It has been entirely too long, so sorry. February is a very busy month in this hippie household. Not only did we have a bunch of birthdays, but the kiddos were off for an entire week, my youngest daughter, Bella, was sick, the girls and lil'Hugo all started ball, and hubby's been working 6 days a week!!!! Whew! The month just flew by!
   But I'm back now with a piece that I've been excited to share with you  for an entire month. Today it's all about the thrift store! Here, in Poway, we have an awesome Salvation Army. I have picked up some really nice things for dirt cheap. In January we stopped in and got Lillianna a brand new pair of banana republic jeans, that fit her perfectly, for $4! That day we also found her a cute little top, a sweater and a pair of shoes, a complete outfit for $18.
   My kids love shopping at the thrift store too! Well, the girls do anyway. We never really find boys clothes, but they get other things, like books~which they allow the kids to get 2 free~ hats, shoes, backpacks, and other stuff like that. I'm glad that my kids see the value in buying things that aren't necessarily "new". I really want them to learn how to spend money wisely.
   The prices are pretty low to begin with, but then, oh yeah, they have sale days! My kids get all excited when they see the "50% or 75% off" sign hanging in the window. You'd think it was Christmas! It's really the cutest thing ever. How many kids, especially kids in junior high that WANT to get their clothes from a thrift store? Not many.
   Anyway, The twin's birthday was on the first of February. All the bills had been paid, and we were pretty low on funds, but I still wanted to get them a little something. So, I picked them up from school early, took them to in-n-out for lunch and then we headed over to the thrift store. Just our luck it was 50% off Friday :)
   Lillianna found 2 very cute dresses, a romper and a skirt. Adrien got a hat that holds two drinks, one on each side with straws in it. Bella got a new dress, a pair of shoes and a pair of shorts. I grabbed a lunch box for lil'Hugo. And I got myself 2 skirts, 4 dresses, and 3 pairs of shoes. Our grand total? $50! That's what I'm talking about right there!!!
   Not only do we get a better value, but it's a form of recycling. I feel like I'm getting more for my money, while helping to reduce waste. I'm not buying into the whole bigger, better, more more more mind set that I feel society says is the way it should be. It makes my wallet and my heart happy :)
   People always compliment me on how cute I look, or how nicely dressed my kids are. I looooooove the look on their face when I tell them we got it at the thrift store. Pure satisfaction!
 
That's me, in the middle, in a dress I got at the thrift store for $3
Liked this one so much I got it in black and red. It's from The Limited, cost me $4 each. An the shoes were $2.50
This is my youngest daughter, Bella, second day of school in her $3 thrift store outfit~$1 for the shirt, $2 for the shorts.
Another $2 pair of shorts
Adrien's soda drink hat
Hugo's $3 lunch box
One of my new $2 skirts
$2 dress, it's big, but I'm gonna fix that ;)
Bella's $2 dress and $2.50 shoes
Lilly's sweater that she bought with her own money
 
   These are just a few pics that I had on hand of some of the things we've picked up at our local thrift store. I encourage you to stop by your local thrift store and check it out, you never know...your next favorite outfit could be waiting for you!


Wednesday, February 20, 2013

Sorry I've been so quiet...

   The beginning of this month was very busy for us. My twins had their birthday on the first, my nephew's birthday was the third and mine was on the fifth!!!! We made it through all of our birthdays with lots of fun, love, and a few gifts.
   I can't believe how quickly my kiddos are growing up! The twins are twelve, my oldest is thirteen and my youngest will be ten next month. They will all be double digits in age!!!! How did that happen??? Weren't they all just babies?
   Oh how I longed for the day when they'd all be out of diapers, sleeping through the night, no longer breastfeeding, and self sufficient. Now, I miss those things. I miss having a baby to hold, a baby that needs me and thinks I'm the greatest.
   While I know that my big kids still love me, these older years bring new challenges that are just... well... no fun! Give me a tantrum throwing toddler any day, a teenager with attitude? No thanks! Can I pass on this? I know one day I'll look back on this time, smile and laugh, but for now... LORD help me!!!!
  

Wednesday, January 30, 2013

homemade almond milk (raw, vegan)

   I have to be honest. I don't like store bought almond milk. The only thing I use it for is to make smoothies for the kids. I skeptical about making this, but the almonds were on sale and I figured if I didn't like it the kids would be drinking smoothies for breakfast for a few days.
   I got the recipe here. But I'm going to tell you what I did, again, I'm not very good at following recipes exactly...

Ingredients:
1 1/2 cups soaked almonds
3 1/2 cups filtered water
pinch of sea salt
2 tsp vanilla extract


Directions:
*Soak almonds over night.
   Put almonds in a bowl that has a lid. Add about 2 cups of warm water, put lid on, and
   enjoy the rest of your evening. Drain and rinse the almonds, then peel the skins off
   (optional)
*Place everything in blender and blend on high for about a minute.
*Place a cloth napkin over a pitcher and pour milk through to strain.
*Squeeze and ring napkin out to get as much liquid out as possible.
*Refrigerate you awesome, yummy milk and enjoy!

   The first time I made this I did follow the recipe exactly, but thought that the honey made it too sweet. So this time I left it out all together and it was Delicious! See? Easy peasy!

Soaking the almonds

Peeling the almonds

Everything in the blendtec

After it's all been blended

My napkin over my pitcher

Pouring in the milk to strain

You do have to hold the napkin to keep it from falling in the pitcher
 

After the blender's empty, pull your napking up

 Squueze and wring out the liquid
 
Now that's it all wrung out

You're left with this beautiful almond pulp

Place it in a bowl and store in the fridge until you decide what you wanna do with it

I keep my milk in a mason jar

You know you're thirsty now!

This morning I enjoyed it with my oatmeal.
 
 
   I posted a recipe for making cereal using the left over almond pulp. I also used some of the pulp to "bread" my eggplant parmesean today at lunch. I will be looking into more useful and creative ways to use this beautiful by product, and I'll definitely let ya know what I come up with! 


Tuesday, January 29, 2013

homemade cereal

   So, when I did the 3 day cleanse this last weekend I made my own almond milk. After I made the almond milk I had left over almond pulp. I thought about feeding it to our chicken, but then I decided to google recipes for leftover almond pulp to see if there was a way to use it in the house instead.
   I looked through a few recipes, but a lot of them were raw and required a dehydrator, which I don't have, or they required ingredients that I didn't have. Then I found this recipe. It looked delicious and seemed simple enough. I was out of coconut, but didn't mind going out to get some because I'm quite partial to it.
   I waited until Sunday night to make this, because I couldn't eat it while doing the cleanse and I just knew it was going to be super yummy. So, here's what I did...


Ingredients:
1 cup packed almond pulp
3/4 cup dried coconut flakes (that I pulsed in my blendtec 'til they were more like shredded)
2/3 cup oat flour (oatmeal pulsed in blendtec until it's flour)
1/3 cup honey
2 tsp vanilla
1/2 tsp vanilla powder
1/4 tsp cinnamon
1/8 tsp salt

Directions:
Mix everything together in a big bowl.
Spread mixture out into a lined pan, I used wax paper.
Put in oven on lowest setting over night.
  

   My oven's lowest setting is 170. I put it in about 8:15pm and had hubby turn the oven off when he got up in the morning, about 5am. The cereal came out nice and crunchy and yummyliscious!!! I ate it for breakfast yesterday and today using the almond milk, instead of cow's milk. My oldest daughter is the only kid that's tasted it and she really likes it. She wasn't a huge fan of the almond milk though. That's alright by me, just means I get to be the one to drink it all!

The almond pulp.
Everything all mixed together.
I just plopped it all in the pan and smoothed it out with my hands.
Then I used my pizza cutter to cut it into little squares.
When it was done i popped the little squares into a tupperware.
yummmmmmmmmmmmmmmmmm!!!!!!!!!!!!!!!!!!!!!!!!!